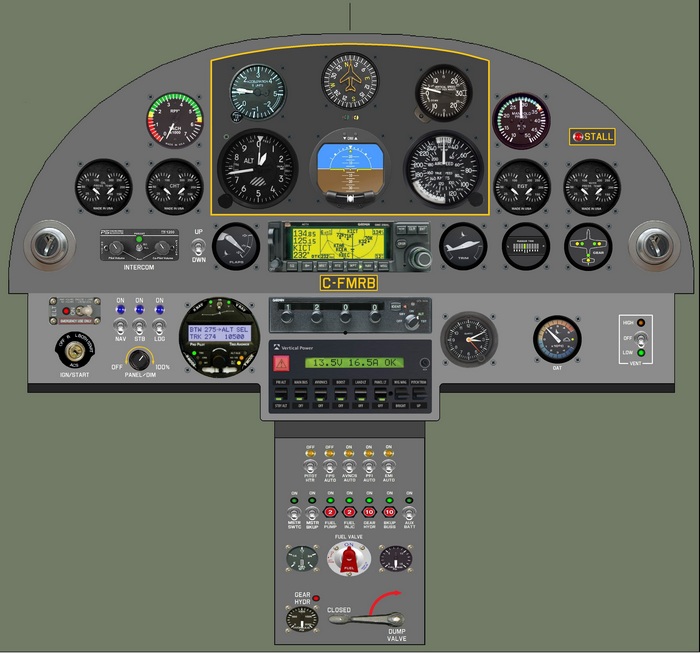
Control Panel
(Sep 1, 2010)
I believe that dedicating a page on the control panel was in order considering that this is where "everything" happens. Let's face it; this is where all the nodes get together. You control the aircraft from there. That simple. And trust me, it takes a lot of time to figure all that out. Especially if you plan to add "Auto-Pilot", fancy avionics and surface control automation (auto-trim devices, overspeed flap controls, etc).
After extensive searches on the WEB, I think that I've found a very interesting combination of gauges (read about it here) and controls that propose modern technology yet preserving a classic look. By "classic look" and "modern technology", I mean "round gauges with needles" but with integrated high end electronic components to provide accurate and reliable performance yet, being lightweight and showing very stylish faceplate. There are a few components that have a digital display but still, they integrate quite well somehow with respect to the "WWII Warbird Era" philosophy.
To complement and enhance the overall appearance (read: "professional look") of the control panel(s), I intend to label all the switches and gauges with "dry transfer" type labeling system (read about it here). Of course you can buy label machines like a "P-Touch" (or red plastic labels with a Dymo...) but to me, it just doesn't look nice. Besides, plastic labels tends to wear out or tarnish quite quickly so if I'm going to spend a $130k+ on a piece of kit, I'm not going to use P-Touch stuff.
I'm not quite sure if my design would work or not because I don't have the "kit" in from of me yet. However, I've visited several builder's logs and pages and it looks that I should be fine.
But why buzzing myself like that so early on the control panel? Well, just think that I've spent at least a 100 hours trying to figure out "which gauge does what", which one is required and which functions I need to control (or need to be). Sooner or later you'll have to do it anyway. In addition, I believe that selecting the gauges and controls early at the planning stage leads you on the "power management" track soon enough (read about it here) to understand and configure, at an early stage as well, the power requirements of your aircraft systems and components. I sure that no one can argue my approach. Like it or not, you'd better figure all that before hand or you'll end up one day, skinning the airframe and realize afterward that "oh shit..."
From all the builder's pages and logs that I've visited so far, there's only a few that I'd be happy to have "my panel" done their way. I'm not criticizing other's work but based on my own experience, I know that most of the guys are less (sometimes, "much less") picky than me. In other words, I'm not going to install (accept) dislike screw types or tolerate chipped paint surfaces... I've seen panels that looked like they were done at the factory. Real pieces of art. Impeccable. And I'm sure it adds to the overall value of your aircraft thus, if it ever happens (one day for sure), It'll boost up the resale value when posted on Ebay.
I have a lot of experience in motorsports and recreational vehicles of many kind but aviation... Now, I don't think that I've became "an expert" but I know a lot more and I believe that I've selected components and configured them together so I'll end up with a functional and efficient control panel.
I have prepared over 20 variants of the control panel (and still upgrading) but I'm in the "refining/tweaking" phase. I don't think that I'll come up with something any better than the last one except for few modifications here and there. And it is pointless to hope "copying" the original dashpanel; the warbird was equipped with guns intercoolers and all kinds of devices that you won't find on the T-51. However, it won't hurt getting close to it somehow.
Let say that the first panel was a timid attempt to integrate a "Glass Cockpit" to the T-51 panel. It would work no problem but I've realized later that a glass cockpit just doesn't have it's place in a WWII warbird replica. Then I started to search for "steam gauges" that would provide both convenience and style to the cockpit panel respecting the P-51.panel layout. Well, the end result isn't at all like one on a P-51 but at least, I won't stare at a "TV set" when I'll fly the T-51. Just see for yourself


